Today I have released a neew tool to be able to debug your live website by executing all the code you want easilly.
You gonna love it but you will not never tell anybody that your are using it :-D
Who never had an incomprehensible error in a sitecore website in production and want o be able to execute a line of code IN THE CONTEXT OF YOUR SITE.
This tool is available on the sitecore marketplace: https://marketplace.sitecore.net/en/Modules/U/UniversalDebugger.aspx and on github: https://github.com/VGBenjamin/UniversalDebugger
Showing posts with label Modules. Show all posts
November 9, 2018
The evil code debugging tool is here
Categories : Sitecore,
Admin and Security,
Modules
October 22, 2014
New on the marketplace : Image Optimizer V2
I have just release a new module on the marketplace today: Image Optimizer V2
History
The first version has been developed by MIKAEL HÖGBERG is available here. Here is his blog post about it: http://mikael.com/2013/08/image-optimizer-module/ A very big thank you for this module!
New features
This version 2 is now based on jpegtran and pngquant to compress the pictures but you can use your favorite tool if you prefer. The biggest addition of this module is a wizard similar to the publishing wizard which allow you to compress a complete folder in place of compressing picture per picture.
Installation
- Install the packages with the /sitecore/admin/UpdateInstallationWizard.aspx
- Download pngquant here: http://pngquant.org/ under the section "Command Line" / "Binary for windows" and save this file in the root of your data folder.
- Download jpegtran here: http://jpegclub.org/jpegtran.exe and save this file in the root of your data folder.
Advanced configurations
The configuration file is available in _App_Config\Include\ImageOptimizer.config. The following setting are available
- imageOptimizer.pngCommand: The path to the png commande line tool for the png
- imageOptimizer.pngOptions: The command line arguments
- imageOptimizer.jpgCommand: The path to the png commande line tool for the jpg
- imageOptimizer.jpgOptions: The command line arguments
- imageOptimizer.PoolingInterval: The pool interval for the wizard you shouldn't change it
July 9, 2012
Image Extension Module
I have release a new module on trac. This module is an extension of the sitecore control <sc:Image /> who add 2 possibilities:
- Use the real file extension in place of the .ashx used by sitecore. (This functionality is better for the SEO but also allow you to apply a transparency filter on IE6 to your PNG files.)
- Set a default image who will appear when the image field is empty. This setting is configurable at two level: on the site level and control per control.
June 22, 2012
Sublayout Queryable Datasource module on trac
I have release a new module on trac. This one allow you to select the datasource dynamically with a XPath query in the dialog open when you insert a sublayout in webedit mode.
If you don't like the video version here is a small description of this module.
Purpose
If you have a multisite solution and if you want to use the field "Datasource Location" and "Datasource template" on you sublayout to open the datasource selection dialog when you add this sublayout on your page in page edit mode, you are not able to select the folder dynamically. by default sitecore only allow to select a folder like /sitecore/content/MyDatas. The idea of this module is to enable the possibility to select this folder relatively to the current item with an XPath query as you do in the fields for example. After installing this module you will be able to select this folder with a query syntaxt like this one for example:query:ancestor-or-self::*[@@templatename = 'Website Root']/Data/Demo
How to Install?
- You can download package from here.
- Install it with the sitecore installation tool in the desktop of sitecore
Next steps
If you have any issues or suggestions for the Sublayout Queryable Datasource module, please report it by posting a comment on this post.November 25, 2010
How to use the multisite manager
After some experimentation with the multi sites in sitecore and the Multi Sites Manager package, here are some tips.
Using the multi site (in the web.config)
You need to add your sites in the node in the web.config. But you need to add your websites just after the shell and login nodes . If you put your website in first position, you will experience errors with the login of the sitecore admin.
Example:
Using the Multi Site Manager
To create a new website, follow these steps:
Add a new website and complete these fields: rootPath, startItem and the hostname
Publish the full website
Flush the sites!! (this button will create the new sites. Flush the sites after every modification)
Important
With the multi-sites manager, if you use different domains for different websites, you will probably have a "access is denied" error. Normally you have a security feature to access the sites. To show this column in the security editor, click on "Columns" and check "Site Enter".
But this functionality doesn't work ;-D
How to resolve the "access is denied" error?
You can just replace:
by
Using the multi site (in the web.config)
You need to add your sites in the node in the web.config. But you need to add your websites just after the shell and login nodes . If you put your website in first position, you will experience errors with the login of the sitecore admin.
Example:
<sites> <site name="shell" virtualFolder="/sitecore/shell" physicalFolder="/sitecore/shell" rootPath="/sitecore/content" startItem="/home" language="en" database="core" domain="sitecore" loginPage="/sitecore/login" content="master" contentStartItem="/Home" enableWorkflow="true" xmlControlPage="/sitecore/shell/default.aspx" browserTitle="Sitecore" htmlCacheSize="2MB" registryCacheSize="3MB" viewStateCacheSize="200KB" xslCacheSize="5MB"/> <site name="login" virtualFolder="/sitecore/login" physicalFolder="/sitecore/login" database="core" domain="sitecore"/> 
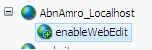
<site name="myWebsite" hostName="myWebsite.be" virtualFolder="/" physicalFolder="/" startItem="/" contentStartItem="/default" rootPath="/sitecore/content/myWebSite" database="web" domain="sitecore" allowDebug="true" cacheHtml="true" htmlCacheSize="10MB" enablePreview="true" enableWebEdit="true" enableDebugger="true" disableClientData="false" /> <site name="testing" virtualFolder="/sitecore/testing" physicalFolder="/sitecore/testing" rootPath="/sitecore/content" database="master" domain="sitecore" enableWorkflow="true"/>
Using the Multi Site Manager
To create a new website, follow these steps:
Add a new website and complete these fields: rootPath, startItem and the hostname
Publish the full website
Flush the sites!! (this button will create the new sites. Flush the sites after every modification)
Important
With the multi-sites manager, if you use different domains for different websites, you will probably have a "access is denied" error. Normally you have a security feature to access the sites. To show this column in the security editor, click on "Columns" and check "Site Enter".
But this functionality doesn't work ;-D
How to resolve the "access is denied" error?
You can just replace:
<!- SITES -> <siteManager defaultProvider="config"> <providers> <clear/> <add name="config" type="Sitecore.Sites.ConfigSiteProvider, Sitecore.Kernel" siteList="sites" checkSecurity="false"/> </providers> </siteManager>
by
<!- SITES -> <siteManager defaultProvider="config"> <providers> <clear/> <add name="config" type="Sitecore.Sites.ConfigSiteProviderHack, MultiSitesManager" siteList="sites" checkSecurity="false"/> </providers> </siteManager>
How to enable web edit with the multisite module?
You can add a site attribute to a website defined.
Name it "enableWebEdit" and give a value "true" (because default it is false)
It will look like:

And it works!
Name it "enableWebEdit" and give a value "true" (because default it is false)
It will look like:

And it works!
Subscribe to:
Posts (Atom)