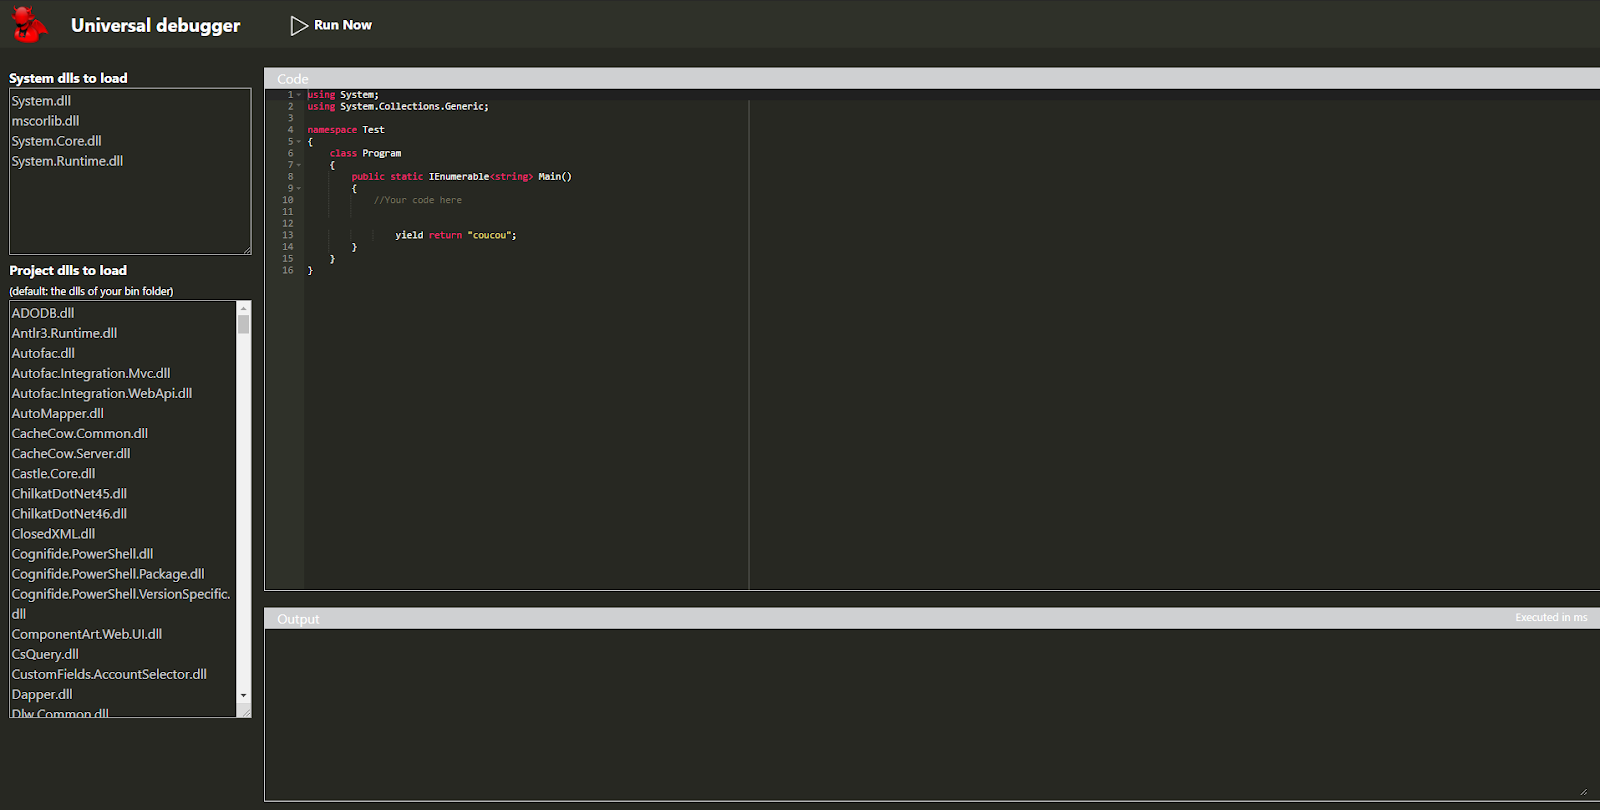
Today I have released a neew tool to be able to debug your live website by executing all the code you want easilly.
You gonna love it but you will not never tell anybody that your are using it :-D
Who never had an incomprehensible error in a sitecore website in production and want o be able to execute a line of code IN THE CONTEXT OF YOUR SITE.
This tool is available on the sitecore marketplace: https://marketplace.sitecore.net/en/Modules/U/UniversalDebugger.aspx and on github: https://github.com/VGBenjamin/UniversalDebugger
Showing posts with label Admin and Security. Show all posts
November 9, 2018
The evil code debugging tool is here
Categories : Sitecore,
Admin and Security,
Modules
May 29, 2012
Reset the admin passord
To reset the 'admin' password to 'b' the easest way is to execute this SQL script on the core database:
EDIT: Gary Jutras have propose an improved version of this sql. Thank you for it.
UPDATE [aspnet_Membership] SET Password='qOvF8m8F2IcWMvfOBjJYHmfLABc='
WHERE UserId IN (SELECT UserId FROM [aspnet_Users] WHERE UserName = 'sitecore\Admin')
EDIT: Gary Jutras have propose an improved version of this sql. Thank you for it.
UPDATE dbo.aspnet_Membership SET [Password]='qOvF8m8F2IcWMvfOBjJYHmfLABc=', [PasswordSalt]='OM5gu45RQuJ76itRvkSPFw==', [IsApproved] = '1', [IsLockedOut] = '0' WHERE UserId IN (SELECT UserId FROM dbo.aspnet_Users WHERE UserName = 'sitecore\Admin')
November 15, 2011
Add a publish button in the contextual menu
To add a publish button in the contextal menu as in the screenshot below it is very simple:
- Open the core database
- Go to the item /sitecore/content/Applications/Content Editor/Context Menues/Default and duplicate the item Insert for example
- Set the fields values to:
- Display Name: Publish Item
- Message: item:publish(id=$Target)
September 20, 2011
Sitecore installation tips and tricks
Recently I have done one of the most difficult installation of sitecore I have never done. Not because of sitecore himself but because of IIS, the firewall, the sql server, …
Here is some tips you can use if you have some trouble to install sitecore :
IIS Errors
If you have this error : « This configuration section cannot be used at this path. This happens when the section is locked at a parent level. Locking is either by default (overrideModeDefault='Deny'), or set explicitly by a location tag with overrideMode='Deny' or the legacy allowOverride='false'. »
If the website return a blank page or an error:
SQL Errors
If you have an sql error :
If the website return a blank page :
If the license is missing :
Here is some tips you can use if you have some trouble to install sitecore :
IIS Errors
If you have this error : « This configuration section cannot be used at this path. This happens when the section is locked at a parent level. Locking is either by default (overrideModeDefault='Deny'), or set explicitly by a location tag with overrideMode='Deny' or the legacy allowOverride='false'. »
- Execute this command : %windir%\system32\inetsrv\appcmd.exe unlock config -section:system.webServer/security/requestFiltering
If the website return a blank page or an error:
- Check if all the required windows component are installed (IIS, Dotnet, …)
- Check if the server doesn’t need a reboot to install some components or updates
- Execute an aspnet_regiis –i
- Check if you don’t have some strange Query strings or http verbs blocked in the IIS request filtering
SQL Errors
If you have an sql error :
- Check your connectionstring in connectionstrings.config
- Check if the local firewall doesn’t block your query (cf windows eventviewer)
- Check if the global firewall doesn’t block the request
- from the web server to the sql server
- from the sql server to the web server
- Check the network route is correct (especially if you have more than one network card on this server) (use the command « route PRINT » to see it) and use the command « route –p add » if needed
- Put the server name in the hostfile
- If you use the active directory
- you will maybe need to use the impersonate (cf. web.config)
- The user need to have the access write to the web server and the sql server
If the website return a blank page :
- Try to add a page test.htm at the root of your website folder and call it to see if iis work.
If the license is missing :
- Check in the web.config if the datafolder and the licensefolder is set correctly
- Check if the App Pool user have the read access to the license.xml file
- Check if the license file is correct
- Unzip and execute this package (as administrator) : http://sdn.sitecore.net/upload/sdn5/faq/administration/sitecorecounters.zip
- Check if the user of the App Pool is in the windows user group : « Performance Monitor Users »
- If you want to use the Framework 4.0 http://sdn.sitecore.net/upload/sitecore6/64/integrating%20an%20asp.net%20mvc%20web%20application%20in%20sitecore%20cms-a4.pdf
- If possible set the App Pool in « Integrated » mode
July 15, 2011
New module on trac
Here is my first contribution in association with the LBi to the Shared Source library.
http://trac.sitecore.net/ScheduledTaskUtils
This module allows you to run manually a sitecore scheduler. This is very useful especially when you try to debug a scheduler.
Here is a small screenshot
http://trac.sitecore.net/ScheduledTaskUtils
This module allows you to run manually a sitecore scheduler. This is very useful especially when you try to debug a scheduler.
Here is a small screenshot
If you have some bug of improvement request, you can post a reply to this post.
Categories : Sitecore,
Admin and Security,
Shared Source
February 20, 2011
Create a desktop shortcut to the core content editor
Here is a small tip to create a shortcut to the content editor of the core database that will be accessible even if you currently on the master database. This is very useful to not always switching between the databases.
- Switch to the core database
- Open the content editor
- Drag’n drop the sitecore element from the content editor to the desktop
- Right click on this new shortcut and change the name and the icon to personalize it
February 18, 2011
Set the root folder of the file Explorer
There is a very simple way to allow your user to upload (or download) some files from sitecore to a specific folder.
Follow these steps:
Follow these steps:
- Go to the core DB
- Duplicate /sitecore/content/Documents and settings/All users/Start menu/Programs/File Explorer
- In the duplicated shorcut, edit the field "Parameters" and set the root folder. Example: "ro=\design\upload\modules"
January 27, 2011
Use the sitecore jobs
When you need to do some long running operations in the Sitecore backend (like an import form example) most of the time we do that as we do for the small tasks.
But this is not a very good practice because the task is synchronous in the main thread and the admin is freeze until the task is finished.
In sitecore they are a very simple way to execute these tasks in another thread: the jobs.
Here is a small code snippet to create a job :
You may also launch a timer to check the status (how many items are already imported for example) but I will create another subject about “How to create a admin wizard”
But this is not a very good practice because the task is synchronous in the main thread and the admin is freeze until the task is finished.
In sitecore they are a very simple way to execute these tasks in another thread: the jobs.
Here is a small code snippet to create a job :
//Create the options and pass some attributes
JobOptions options2 = new JobOptions("The job name", "The job category", "MyWebsiteName", MyObjectInstanceThanContainTheMethodToExecute, "The Method Name To Exectute", new object[] { parameter1ForTheMethod, parameter2ForTheMethod });
options2.ContextUser = Context.User;
//This line allow to keep the job alive at least the time needed to check the lastest infos for the status.
options2.AfterLife = TimeSpan.FromMilliseconds((double)(POOLING_INTERVAL * 2));
//The thread priority
options2.Priority = System.Threading.ThreadPriority.Normal;
//Start the job himself
Job job = JobManager.Start(options2);
job.Options.CustomData = status; //Status is a object shared between my job and this class (to check the status of the import)
//Keep an instance of the if you need to check his status
this.JobHandle = job.Handle.ToString();
You may also launch a timer to check the status (how many items are already imported for example) but I will create another subject about “How to create a admin wizard”
January 4, 2011
Interact with the user in the admin forms
In the XAML forms, you may interact with the user with these kind of method
Display a popup:
Download a file
Display an input
Change the HTML in ajax:
Launch a timer (to refresh the page every XX seconds for example)
If you inherit from WizardFrom these methods work perfectly, but if you inherit from Sitecore.Web.UI.Sheer.BaseForm it seem that it doesn't work.
Here is a simple workaround to bypass this limitation:
Display a popup:
Sitecore.Context.ClientPage.ClientResponse.Alert("My message");
Download a file
Sitecore.Context.ClientPage.ClientResponse.Download(@"c:\MyPath\Myfile.xxx");
Display an input
Input(string text, string defaultValue, string validation, string validationText, int maxLength)
Change the HTML in ajax:
SheerResponse.SetInnerHtml("MyBorderName", "My String");
Launch a timer (to refresh the page every XX seconds for example)
SheerResponse.Timer("CheckStatus", 100);
If you inherit from WizardFrom these methods work perfectly, but if you inherit from Sitecore.Web.UI.Sheer.BaseForm it seem that it doesn't work.
Here is a simple workaround to bypass this limitation:
- Add this in you xaml:
<script type='text/javascript'>window.setTimeout('scForm.invoke("local:show")', 0)</script> - And now you can invoke these methods without problems
[HandleMessage("local:show")] protected void Show(Message message) { //This method work to launch a timer SheerResponse.Timer("CheckStatus", 100); }
November 29, 2010
How to display popup messages in the admin
If you need to interact with the sitecore interface with a custom field or a custom sitecore admin screen you will probably need some input from the user, alert, ...
This operation is possible with only a few lines of code:
Show a popup:
Sitecore.Context.ClientPage.ClientResponse.Alert("My message");
Download a file
Sitecore.Context.ClientPage.ClientResponse.Download(@"c:\MyPath\Myfile.xxx");
To create an input, use this function:
Input(string text, string defaultValue, string validation, string validationText, int maxLength)
A complete example of code for the input:
This operation is possible with only a few lines of code:
Show a popup:
Sitecore.Context.ClientPage.ClientResponse.Alert("My message");
Download a file
Sitecore.Context.ClientPage.ClientResponse.Download(@"c:\MyPath\Myfile.xxx");
To create an input, use this function:
Input(string text, string defaultValue, string validation, string validationText, int maxLength)
A complete example of code for the input:
using System;
using System.Collections.Generic;
using System.Linq;
using System.Text;
using Sitecore.Data.Items;
using Sitecore.Data.Fields;
using Sitecore;
using Sitecore.Diagnostics;
namespace MyNamespace
{
class MyClass : Sitecore.Shell.Framework.Commands.Command
{
public override void Execute(Sitecore.Shell.Framework.Commands.CommandContext context)
{
if (context.Items.Length == 1)
{
Sitecore.Data.Items.Item item = context.Items[0];
System.Collections.Specialized.NameValueCollection parameters = new System.Collections.Specialized.NameValueCollection();
parameters["id"] = item.ID.ToString();
parameters["language"] = item.Language.ToString();
parameters["database"] = item.Database.Name;
Sitecore.Context.ClientPage.Start(this, "Run", parameters);
}
}
protected void Run(Sitecore.Web.UI.Sheer.ClientPipelineArgs args)
{
if (args.IsPostBack)
{
if ((!String.IsNullOrEmpty(args.Result)) && args.Result != "undefined" && args.Result != "null")
{
Sitecore.Data.Database db = Sitecore.Configuration.Factory.GetDatabase(args.Parameters["database"]);
Sitecore.Data.Items.Item myItem = db.GetItem(new Sitecore.Data.ID(args.Parameters["id"]));
}
}
else
{
Sitecore.Context.ClientPage.ClientResponse.Input("My Message:"
, "My Default Value"
, Sitecore.Configuration.Settings.ItemNameValidation
, "'$Input' is not a valid name.", MaxLenght);
args.WaitForPostBack();
}
}
}
}
November 25, 2010
Change the height of a mulit-line field
In the standard values of the field, section appearance, set the value of the field Style to height:300px;
Set a default folder for the Sitecore File Explorer Application
To set the default folder for the File Explorer application follow these steps:
- Log in to Sitecore CMS as an admin user
- Switch to the Core database and open the Content Editor application.
- Go to the /sitecore/content/Documents and settings/All users/Start menu/Right/Development Tools/File Explorer/ item.
- Add the “ro=/sitecore/shell/” value to the Parameters field.
See the logged users in the admin and kick it if needed
Sometime you need to kick some users but you only see the kick user screen when you try to login if they are allready the maximum users logged.
But you can use this screen:
http://website.com/sitecore/shell/Applications/Login/Users/Kick.aspx
But you can use this screen:
http://website.com/sitecore/shell/Applications/Login/Users/Kick.aspx
Get the logged users data in preview mode
Preview mode is always run in the context of anonymous user.
If you need the user from the admin you can use this method:
Sitecore.Publishing.PreviewManager.RestoreUser();
PS: This method work in the handlers too
If you need the user from the admin you can use this method:
Sitecore.Publishing.PreviewManager.RestoreUser();
PS: This method work in the handlers too
Subscribe to:
Posts (Atom)


